
Reese’s peanut butter cup cookies are easy treats to bake and enjoy with the whole family. You can decorate them in any way you desire.
By Melissa Olivares
Staff Writer
Spooky season is upon us and you know what that means: horror movies, jack-o’-lanterns and most importantly, Halloween treats. Here are some homemade goodies that will make your Halloween absolutely spooktacular!
Pumpkin-shaped Rice Krispie treats
Ingredients:
-6 cups Rice Krispies cereal
-5 tablespoons butter
-10 ounces marshmallows
-Orange food coloring
-Pretzel sticks/ mini Reese’s peanut butter cups
-Green M&M’s/ green frosting
Optional Ingredients:
-½ teaspoon vanilla
-½ tablespoon pumpkin spice
Instructions:
- Begin by melting your butter in a large pot over low heat.
- Once the butter liquefies, add the marshmallows and
stir constantly until completely combined. Remove from heat. - Next, add a few drops of orange food coloring to the marshmallow-butter mixture as well as vanilla and pumpkin spice if desired.
- Immediately add the Rice Krispies and stir.
- Prepare a baking sheet lined with parchment paper to put the treats on. Coat hands with non-stick cooking spray and begin shaping the Rice Krispies into small balls.
- For your stem, gently place a pretzel stick or mini Reese’s peanut butter cup on top while they are still warm. Then, add M&M’s or frosting to resemble pumpkin’s leaf.
- Let them cool and enjoy your adorable Halloween treat!
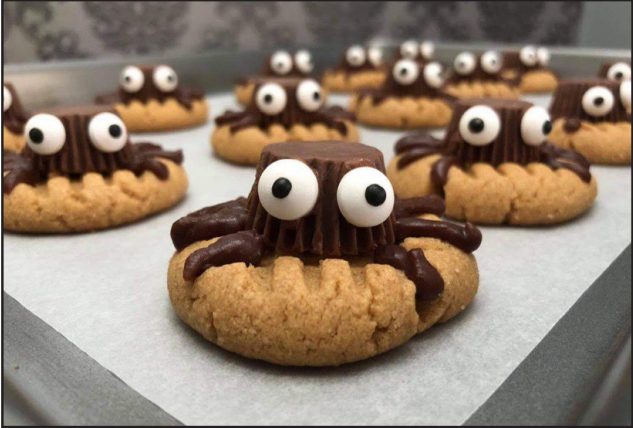
Reese’s peanut butter cup spider cookies
Ingredients:
-1 cup peanut butter
-1 cup sugar
-1 egg
-Reese’s peanut butter cups
-Chocolate candy melts
-Candy eyes
Instructions:
- Start by preheating the oven to 350°F. Then, prepare a baking sheet lined with parchment paper.
- In a medium bowl, mix together the peanut butter, sugar and egg until thoroughly combined.
- Take small portions of the cookie dough and roll them into a golf-ball-sized sphere. Place on the tray and then, press down with a fork in a criss-cross pattern.
- Bake for 15 minutes. These cookies are best when browned slightly on the bottom and still soft.
- While they are still warm, press the Reese’s peanut butter cup upside down into each cookie to make the spider’s body.
- Next, make the spider’s legs by putting chocolate candy melts in a small bowl and melt them in the microwave in 30-second increments. Take them out and mix them to make sure that they melt properly.
- Make sure to work quickly on this step. Pour a small portion of the melted chocolate in the piping bag, or spoon, and pipe each of the spider’s legs onto the cookies.
- Use a little bit of the leftover chocolate to glue the candy eyes to the side of the Reese’s cup.
Halloween-themed chocolate-covered pretzels
Ingredients:
-Mini snack pretzels
-Orange, white and purple chocolate melts
-Green M&M’s
-Candy eyes
-Dark purple sprinkles
Instructions:
- Prepare a baking sheet lined with parchment paper to place the pretzels on. Make sure all ingredients are accessible for quick decorating.
- To melt the chocolate, put chocolate candy melts in a small bowl and heat them in the microwave in 30-second intervals, taking them out and mixing them in between to prevent the chocolate from burning.
- For pumpkin pretzels, dip a pretzel into orange candy melts and place onto a baking sheet. Before the chocolate sets, put an M&M on the top indent of the pretzel.
- For mummy pretzels, dip pretzels into white candy melts and lay them onto a baking sheet. Place the candy eyes into the two upper cavities and let cool for a bit. Then, fill a small Ziploc bag with the melted white chocolate and snip a small hole at the corner to make a makeshift piping bag. Pipe the white chocolate onto the pretzel in a zigzag pattern.
- For monster pretzels, dip pretzels into the purple candy melts and then into the purple sprinkles, laying it onto the baking sheet when finished. Using the extra chocolate as an adhesive, glue the candy eyes wherever you desire. It is a monster so feel free to go crazy!
- Let them cool until they become solid and enjoy!