
By Janice Wong
Staff Writer
The season of giving is fi-nally here! This year, I decided to make homemade Christmas gifts for my friends and family without breaking the bank. After scouring the Internet, I attempted and reviewed two DIY crafts:
Care box
Like many, I look forward to preparing gifts during the holiday season. This time around, I decided to ditch the usual gift bag presentation and arrange a care box instead.
Materials:
- Plastic container
- Fabric or ribbon
- Rope
- Double-sided tape
- Paper shreds
Instructions:
Wrap rope around the bottom half of the box or container. Decorate the top half with fabric or ribbon. Place colorful paper shreds and gifts inside the container.
Review:
While reading Living Well Mom’s blog, I was initially
intimidated by how aesthetic and gorgeous her care box turned out. However, the small project was actually incredibly easy to make.
Since I did not have the exact materials she had, I changed my materials quite a bit by replacing the cardboard box with a plastic container. I also used a different color for the multi-purpose rope and double-sided tape, instead of a glue gun.
In addition, I replaced the fabric with ribbon and put paper shreds inside for decoration. Surprisingly, I completed the creation in under 30 minutes without spending any money.
The double-sided tape held the rope in place nicely and the ribbon ended in a fine touch. My care box is ideal for gifting goodies to friends and family to enjoy during the holidays.
Marbled ornaments
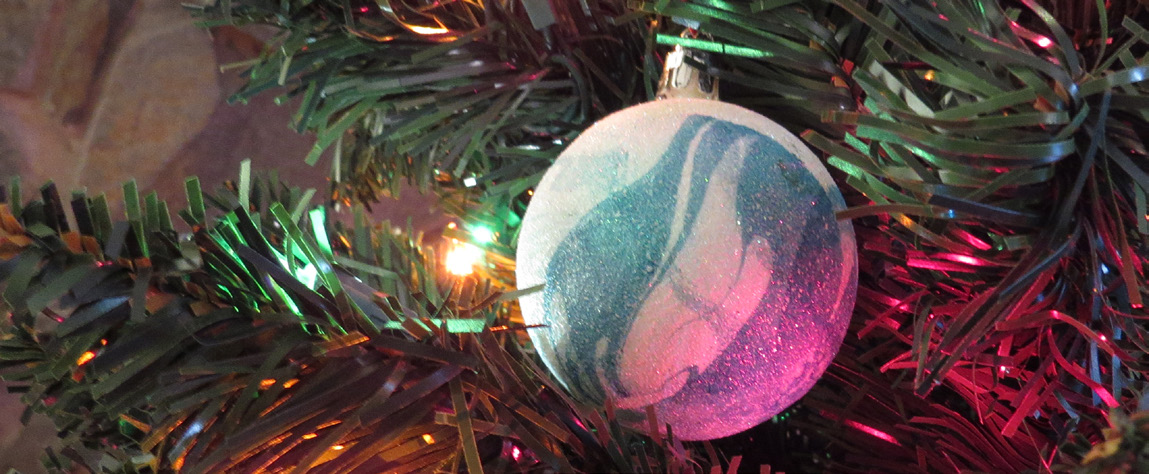
Marbled ornaments are a fun and affordable craft to make during the
holidays. They are a great gift to add a festive accent to your loved ones’ trees.
After hanging boring solid-colored ornaments on my Christmas tree in previous years, I chose to spice it up and add my own twist. Watching Clumsy Crafter’s YouTube tutorial, I
found that I could decorate my ornament with nail polish instead of paint.
Materials:
- Clear or white ornaments
- Nail polish and remover
- Plastic container
- Toothpick
Instructions:
Drizzle varying colors of nail polish on the water surface. Swirl with a toothpick to create a marbled effect. Dip ornament onto the polish. Let dry. Review:
To start off, I drizzled some nail polish onto the surface of the water in my container. Unfortunately, clumps began to form immediately instead of separating evenly so I had to throw it out.
After frustratingly trying a couple more times, I discovered that the reason why the nail polish was clumpy was because the water was too warm. I replaced it with room temperature water and achieved the best results. While lightly stirring with a toothpick, the nail polish transformed into a beautiful swirl.
I finished by dipping and rolling my ornament around in the water. The marbled texture imprinted itself onto the ornament and dried within 20 minutes.
Along with dazzling lights, the marbled ornaments really stood out on my tree. The blue swatches contrasted my white ornament and my tree’s green leaves nicely. Other than a couple of hitches, the craft was ultimately a success.